Screenshot On Mac : How To Screenshot On Mac
What Is Screenshot ?
A screenshot is an image taken of what is visible on your screen. This is a great way to capture what is happening on your screen if you want to share it with someone or keep it for reference.
How To Take A Screenshot On Mac
There are many reasons why you might want to take a screenshot on your Mac. Maybe you want to share something you’ve found online with a friend, or perhaps you need to capture an error message before it disappears. Whatever the reason, taking a screenshot on a Mac is very easy to do. There are a few different methods you can use to take a screenshot on a Mac. The built-in keyboard shortcuts are the quickest way to take a screenshot, but you can also use the Grab application or the Terminal.
Importance Of Taking A Screenshot On Mac
Taking a screenshot on Mac can have many uses. It can help you show your grandparent how to use a new app, send an IT department a screenshot of a strange error message, or capture a tweet before it disappears. A screenshot is an excellent way to share an Instagram story, Twitter update, or website with others. It can also be used to share important messages with friends and family. Luckily, screenshotting on a Mac is easy, and there are just a few keyboard shortcuts you can use to capture the desired part of the screen.
Regardless of your reasons, screenshots can help you save time, money, and frustration. If you are wondering how to screenshot on Mac, you’ve come to the right place. Here you’ll learn the steps, keyboard shortcuts, and how to capture specific parts of the screen.
This tutorial will also cover how to reset the NVRAM memory on your Mac. Hopefully, you’ll find it useful! In this article, we will show you how to take a screenshot on a Mac. We will also show you how to take a screenshot of just a portion of your screen, and how to record a video of your screen. So, if you’ve been wondering how to take a screenshot on a Mac, read on! Take Screenshots On Windows 10
Steps For Taking A Screenshot On Mac
If you’re looking to take a screenshot on Mac, there are some steps you must follow first. Windows 10 offers several methods for taking a screenshot, but macOS has much simpler methods.
you can capture the entire screen with Shift-Command-3. The screenshot window will then pop up with the option to edit it.
Screenshots On Mac Save Default Location
Screenshots on Mac are saved to the desktop by default, but you can make them save to another folder. To change the location, drag the screenshot thumbnail to the folder you want. You can also save the screenshot to a predefined location or to “Other Location”. Once you’ve changed the location, the screenshot will be saved there and will remain there after restarting your Mac. You can also create a screenshot shortcut by pressing the desired key on your keyboard.
First, you need to select a screenshot type. For example, you can choose to capture the entire screen, window, or region of the screen.
Video Screenshot On Mac
You can also record the screen in video. You can even capture the Touch Bar with the help of Command-Shift-6. However, you must know how to use these keyboard shortcuts.
How To Record The Screen On Your Mac
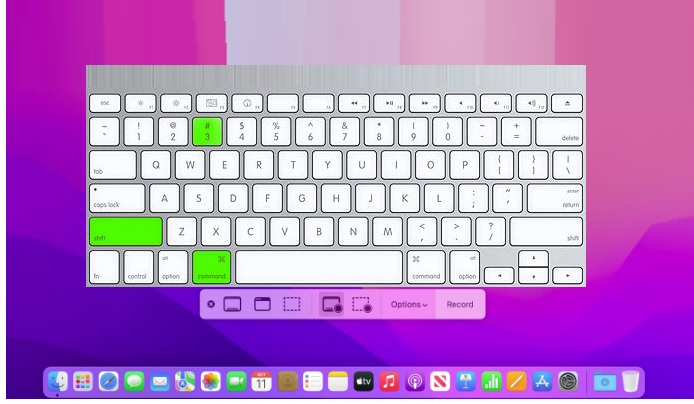
In order to view the Screenshot toolbar, press these three keys together: Shift, Command, and 5. You will see onscreen controls for recording the entire screen, recording a selected portion of the screen, or capturing a still image of your screen
Taking a screenshot is easy on Mac OS X. You can either save the screenshot to your desktop or save it to the clipboard. When you are ready, you can edit the screenshot by clicking the thumbnail in the corner of the screen.
How To Take Screenshots On Mac
Screenshots On Mac Using keyboard shortcuts
Step 1: From any window on your Mac, simply press CMD+Shift+3
Step 2: Click on the preview
Step 3: Apply any edits you wish
Step 4: Click share or Done
All screenshots taken with this method are saved as a JPEG file to the Mac’s desktop by default.
Also Read: How To Use Your iPad As A Second Display For Your Mac
Shortcut For Screenshot On Mac
To take a screenshot on a Mac, you can use the Command+Shift+4 keyboard shortcut. It allows you to screenshot a part of the screen or the entire screen, and saves it to the clipboard. You can then paste it into another application or window. Here are a few more keyboard shortcuts for screenshoting on Mac.
To customize screenshot keyboard shortcuts, click on the Shortcuts tab in System Preferences. In the Shortcuts tab, look for the Screenshots category and click on the corresponding key combination. You may want to change the shortcut to a different key combination if the shortcut you are using does not work.
Another useful keyboard shortcut for screenshoting on mac is Cmd-Shift-5. This will bring up a small panel with screen capture options. You can choose to capture the entire screen, the active window or a portion of the screen. Pressing Option will move the crosshair in the desired direction.
The most common keyboard shortcuts for screenshotting on mac are shift+command+3 and shift+command+4. The command+3 keyboard shortcut captures the entire screen, while shift+command+4 saves only part of the screen. The latter is useful if you want to capture a portion of the screen, or take a screenshot of the touch bar.
Capturing A Specific Part Of The Screenshots On Mac
You can capture a specific part of the screen on Mac by pressing Shift+Cmd+4. This shortcut will change your mouse pointer to a crosshair cursor, allowing you to select a specific area of the screen. You can also select an area by holding down Shift and Command keys while pressing the Space Bar. Then press the Esc key to cancel the capture.
Capturing a specific part of the Mac screen is simple and convenient. Depending on the situation, you can record the entire screen, a portion of it, or a single window. This method can be useful in business presentations, video notes, and other scenarios. Using the screen recording feature is a breeze on macOS, and you can start recording at any time. The easiest method to capture the screen on Mac is to use the Screenshot Utility.
Another handy feature of the screenshot feature is the timer, which allows you to take a screenshot with a certain amount of time. It is useful for recording screen presentations, but the timer does not apply to keyboard shortcuts. You can also choose to display the mouse pointer when taking a screenshot.
How To Crop Screenshot On Mac
Command + Shift + 3 to capture a full screenshot
Command + Shift + 4 to capture a portion of your screen
To capture a specific part of the screen on Mac, you first need to select the area that you want to capture. In order to do so, you have to position the screen so that it is above other screens. Pressing Command-Shift-4 will make the cursor into a crosshair. When you release the mouse button, the screenshot is saved. To edit or delete the screenshot, press “ESC.”
You can capture a window or the entire screen by using the screenshot tool. Depending on the area that you want to capture, you can also choose to capture multiple windows or regions. You can also save screenshots for later.
Resetting NVRAM
Resetting NVRAM to take screenshots in Mac requires you to use the proper keyboard combination to do it. You should hold the option, command, P, and R keys simultaneously for around 20 seconds. It may take a few tries to get the timing right, and you might also need to reset your time zone or startup disk. For MacBook Pro (15-inch, Late 2016), you should hold down the Command+Option+P+R keys for around 20 seconds.
Luckily, this process is relatively simple. To begin the process, you must shut down your Mac completely. Next, you must wait for at least 10 seconds. After that, hold down the Command-Option-P-R keys until you see the login screen. If you don’t see this option, then you can proceed to step two.
To do this, you must open the Terminal app and then go to /Applications/Utilities/Terminal. You can then select the command “Reset NVRAM to take screenshots on mac”. This should clear the NVRAM and make your screenshots easier.
Resetting NVRAM is an easy, quick and safe way to fix screenshot problems on Mac. Resetting NVRAM is done automatically by Apple. If the problem persists, you may need to replace the NVRAM battery or reset the System Management Controller (SMC). You should be able to take a screenshot now.
You can also use the Preview app to take screenshots on your Mac. You can use the feature to capture the entire screen or just a part of it. Alternatively, you can use the floating menu bar to take screenshots.
Also Read: How To Take A Screenshot On Android
Taking A Screenshot Of The Touch Bar
If you want to take a screenshot of the Touch Bar on your Mac, you need to know how to do it. To do so, you should press Command (or Shift) + 6 on your keyboard. The screenshot will be saved to your desktop. It also contains the date and time when it was taken. To save the screenshot in a different location, simply delete it or copy it to the clipboard.
To take a screenshot on your Mac, first you need to open the screenshot menu. There are two types of screenshots: full screen or window. You can also record your screen using the screen recording feature. The screenshots saved to your Mac will be located in the Screenshots folder.
The screenshot you want to take can be copied to an email or another device. You can also press Command + Shift + 4 to take a screenshot. Then, you can paste it anywhere that allows you to insert images. The screenshot is ready to be sent to anyone. You can even share it with your friends and family. This will be very useful for when you need to share a screenshot on social media.
If you want to take a screenshot of the Touch Bar on your Mac, you can do it by customizing your keyboard shortcuts. You can choose to save the screenshot to the desktop or copy it to the clipboard. You can also take a screenshot with the Grab application available on the Mac OS.
To customize the keyboard shortcut for screenshot, go to the Keyboard and Shortcuts tab in the System Preferences. You will find the Screenshots shortcut in the Shortcuts menu.