Take Screenshots On Windows 10
How to Take Screenshots on Windows 10, Win 8 And Win 7
In this post, we’re going to provide some easy and efficient methods you can employ to take screenshots on Windows devices, based on the Window version you’re using. So, we’ll get going.
Method 1: Quick Screenshots on Windows 10
This is a simple method that all you have be doing is to follow the steps below to take screenshots using Windows 10, and you can take flawless clean screenshots on Windows 10.
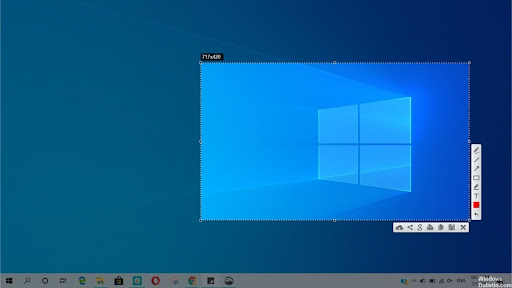
Step 1: Press the Windows key + Shift + S.
2. Step 2: Next you’ll find a clipping menu located near the bottom of your screen. There are three options available:
Step 3: Rectangular Clip.
Step 4: Freeform Clip.
Step 5: Fullscreen Clip.
6. Step 6: You are able to select the option you prefer based on the sort of image or format you’d like to capture.
7. If you choose for a rectangular or free form clip, your mouse’s cursor will transform to a crosshair. You are required to drag the mouse around to choose or define the area you wish for the capture. However, when you select a full-screen clip then the entire screen will be taken in an effective screenshot.
8. Step 8: Once you’ve selected the region that you want to release your mouse or trackpad region you selected will be recorded and copied to the clipboard.
It is easy to copy and edit the image using the clipboard, either in any image editor program an email message OneNote and any other image editing or viewing software.
Method 2: Capture Full Screenshot on Windows 7,8 & 10
This method is suitable for any version of windows, i.e., you can utilize this method to capture a screen shot from your entire computer, regardless of the window’s version, whether 10, 7, or 8. This one is compatible with all three options.
To take a picture from your whole screen you need to press the PrtScn button.
After pressing the the PrtScn key, a screen shot of the entire screen of Windows gets copied to the clipboard as default. From the clipboard, you can view and copy the image wherever you’d like or require for example, into an email, or into any image editor. e.g., Microsoft Paint or Gimp for Windows.
If you wish to copy the image on a program like Gimp and then select Edit > Paste. You may also click the Clipboard Icon within Paint in the home Tab. To make it easy to paste of the screenshot, simply go to the place in which you wish to paste the image and hit Ctrl + V.
Method 3: Alternate Full-screen Capture on Windows 8 & 10
We have mentioned previously that the PrtScn method is compatible with almost every version of Windows. However, for users who are using Windows 8 or 10 we can use an alternative method, or perhaps another trick to take a picture of the entire screen more quickly and easily.
Step 1: Tap the Windows key + PrtScn
2. Then you’ll notice the screen dims in a flash, similar to the shutter of a camera.
Step 3. 3: This indicates that your photo was taken in perfect.
The benefits of this method over of the first are that your screenshot is transferred to your Photos > Screenshotsfolder as default. From there, you are able to access it easily and save time of copying or paste the screenshot from your clipboard.
Method 4: Single Window Screenshot on Windows 8 & 10
This is the simplest and fastest methods you could use to capture screenshots of your screen particularly if you wish to take a picture of a particular Window. You could follow the following steps to take screenshots:
First step Prior to taking the screenshot of one window, you need to be present in the window. This is done by clicking on the name bar.
2. Step 2: Then, press Alt+ PrtScnand an image of the window in use will be taken. The screenshot will be copied to your clipboard.
The image could be easily copied and pasted to any other site of your choice , whether it’s an Email-message or Photo editing software or a preview application anywhere you’d like.
Method 5: Windows Snipping Tool
Snipping Tools is the primary or, you could say built-in software for Windows with which you can snap screenshots quickly and allows you to take greater control over the space you would like to capture on a screenshot. Snipping Tool offers a range of options once the screenshot is taken to edit of the image and sharing it or to share it with others, etc.
Snipping Tool accessible in nearly each version Windows beginning with Windows Vista. It may vary in its features with various versions of Windows.
You can quickly take an image using the Snipping Tool by following the instructions that are provided in this article:
1. Turn on your device , and then hit the Start Button.type “snipping”into your search bar and press Enter.
2. Step 2: Click to open the Snipping Tool in the results of your search.
Step 3. If you’re operating Windows 10, then from this point on, your Snipping Tool will differ in comparison to different versions.
Windows Snipping Tool Modes
Windows 10:open the tool. Click on the snipping tool and then select the Modefrom menu of the snipping tool.
Mode 1 Windows 7 and 8.if the operating system is windows 7 or 8 , after selecting the snipping tool and click the New Button Down-Arrow.
Mode 2 The mode that is available that is available in Windows 10 and New in Windows 7 & 8 offers the user options to pick the design of the area or region on the screen that you wish to take a picture of. You can choose one of them based on your preferences, but prior to you do, you need to be aware of the following choices:
Mode 3 Free-form Snipit permits you to sketch the space you wish to capture with your hands.
Click and hold the mouse button or your trackpad. The cursor may change into crosshair. Move your mouse to drag the crosshair around the area you wish to record.
Mode 1: Rectangular Snip: click and hold the left button of your trackpad or mouse. Move the pointer or crosshair across your screen and draw a rectangle form on screen. All the information inside the rectangular shape will be recorded on the screen immediately when you release the mouse button.
Mode 2. Window Snipas the name suggests , it allows you to take a snapshot of a specific window.
After activating Windows Snipping Tool, once you have activated the Window Snipping Tool, move the mouse towards the window that you would like to record.
Method 5.1: How to Take Full-Screen Screenshot in Windows Snipping Tool
The window you wish to take a picture of will be chosen followed by Click and holdthe mouse to capture the window as a screen shots.
First Step: Full Screen Snipit lets you take a full screen screenshot.
2. Utilizing the Free-form or Rectangular Snip Optionto record the screen can be easy. Once you have chosen the area you wish to capture, release the mouse, and the image will be automatically saved and then be displayed within the Tool for Snipping.
It will be copied to the clipboard should you wish to open the image in a different folder or modify it using any editing software for photos.
3. If you choose Windowsnipto capture the specific window, you’ll need to be very careful about it as If you happen to have clicked on the window in front or behind of it, instead of the window that you are trying to capture, then the image will be captured from the window, either in ahead or behind the window that is active.
Method 5.2: How to Take Free-from Snip Screenshot in Windows Snipping Tool
It’s simple to record the window you prefer to use. place the mouse cursor on the window in question and then press. Screenshot of the window will be taken quickly.
1.: If you would like to capture all of the screen, then choose Full-Screen Snapand your screenshot will be taken in a flash.
2. Step 2: If you’re not pleased with the picture you took , then there’s no need to be concerned, simply create a new screenshot by choosing the New optionfrom the Snipping Tool option.
Step 3: Last but not least If you’re completely happy with your photo You may want to save it. This is easily accomplished by selecting the File menu and selecting Save as, or hit Ctrl +S to save your image instantly all in one shot. Snipping Tool gives you the option of using a Floppy Disk Icon to save your image.
Method 5.3: Using Delay to Capture Pop-up Menus (Windows 10)
We have mentioned previously that Snipping Tool has a variety of choices for different versions of Windows This is why that with Windows Snipping Tool has the new feature of the Delay. This feature is a timer that gives you five seconds to prepare, for instance, when you need to take a photo of a particular step that needs to be manually completed, you can utilize the feature.
This feature is extremely helpful when you wish to capture images of pop-up menus that vanish rapidly or within seconds from after pressing on the button New, or Mode.
You may use the delay feature of the Snipping Tool by using the following features:
Step 1. Start by opening the Snipping Tool, and then from the options displayed on the the bar at the top, click on it.
Second step Then, you are required to select the duration, i.e., selecting the length of time you’d like for the Snipping Tool to stand before it records the screen (up to 5 seconds maximum).
Step 3. Step 3: Once you have finished Click on the New buttonand create or make your screen exactly the way you wish to capture prior to when you’re out of time, i.e. before the timer is set to go off.
One other point to take note of is that the Delay in Snapping Tool does not display the amount of time left similar to what you have observed in the camera of your smartphone. Hence, it is recommended to choose a 5 second window to create the display.
Method 3: Using OneNote Screen Clipping
In addition to the Snipping Tool, you can also utilize to use the Screen Clipping feature provided by the OneNote. Although this Screen Clipping feature of OneNote is only available in older versions, you can make the most of this feature even if you are using an older Version Of OneNote.
The OneNote Clip Tool is discovered and easily used by following the steps below:
First Step First to locate the tool you might have to click on the upward-facing Arrowit could be located on the right-hand side in your computer.
Second step Then you will be directed to a different window, that will show an icon in purple of OneNote together with a scissorson it. Click to open it.
Step 3. Step 3: From your context menu search to Take Screen Clipping. Make Screen clipping.
step 4 Step 4: Then you’ll be asked to select or define the screen’s area that you would like to capture. OneNote will allow you to choose the area and once you have done that, your desktop screen will be frozen for a short time until you’ve chosen the desired area.
5. 5. When you’ve taken the screen successfully, OneNote will open an open window with a small contextual asking you if you would like to save the screenshot to your clipboard or wish to paste the captured image into a fresh notebook, or possibly in the current notebook.
Method 4: Web Shots Using Microsoft Edge Browser
In the past, we’ve been discussing taking screenshots of your screen, whether in full or a specific area or how to capture specific windows using various programs, quick tricks, tips and tricks. “But what will you do if you want to capture a web screen?” The answer can be found in Microsoft Edge.
Microsoft Edgeallows users to capture screenshots of websites using it’s “Web Note” feature that is accessible for Windows 10. However, this could restrict your ability to take screenshots only for web that is, you may not capture screenshots of windows desktop, desktop, or other program.
Therefore, let’s examine how you can utilize this:
The first step 1. Start Microsoft Edge Browser on the upper right-hand corner, you will find a pen-like symbol, i.e. it is to add notesclick upon it.
2. 2. Next, your screen will be frozen for a short time and a toolbar will be displayed in the upper right corner of your browser. Click to clipfrom the toolbar.
Step 3. Step 3: Then, using your mouse click, drag a rectangle, and then select the portion of the website page that you would like to record and when you release the mouse the mouse button. The taken image will be saved onto your clipboard.
Step 4. Step 4: Select the Exiticon that will appear in the upper right corner after you have successfully succeeded in capturing the page and closed your Internet Clipping Toolbar.
5. Then, copy the image wherever you’d like to your clipboard.