6 Top Tips to Improve Your Product Photography
In this list you’ll find 6 essential tips on improving your product photography and in turn increasing sales on your website or for the client – as this is the ultimate goal after all! While we may sometimes get carried away with creative expression in other aspects of photography; almost always the end goal is to sell a certain product which is important to keep in mind but doesn’t mean we can’t be inventive and creative along the way.
1 – Composition

This is perhaps the most important part of achieving the right look for your product as the composition will inform the audience of exactly what this product is trying to sell. So it could be that the product takes centre stage against a blank background in which case the emphasis is of course going to be on the product itself so it has to look better than real life – that’s the objective with a minimalist product shot. You want it to shine, the colours to pop, to highlight it’s form and texture; whatever makes it most appealing.
The iconic coke bottle; the above example really stands out because of the careful composition, dramatic lighting and pop of red colours against a black background. The final touch being the condensation on the bottle, this fact informs you that it’s a cold bottle of coke and leads you to imagining drinking it (this is the intention at least). This is the ultimate objective of product photography: create desire for whatever’s in the frame which the above shot does excellently.
2 – Faithfulness to the Original
I did say that you want the image to appear larger than life but in this section I will clarify that it depends on the client or situation. For website listings, while you want it to look fantastic, you need to make sure the colours especially are as close to real life as possible. I’m sure that you, like myself, have ordered something online and once it’s arrived the colours have not been what you expected. You want to appeal to the customer, not mislead them.
While it’s essential to dress up and enhance the images, you don’t want to lose the product’s inherent traits, which is more often than not, the correct colour. Of course it doesn’t have to be with all products, as I’ve mentioned but you do want to be faithful to the original colour particularly on ecommerce sites.
3 – Details
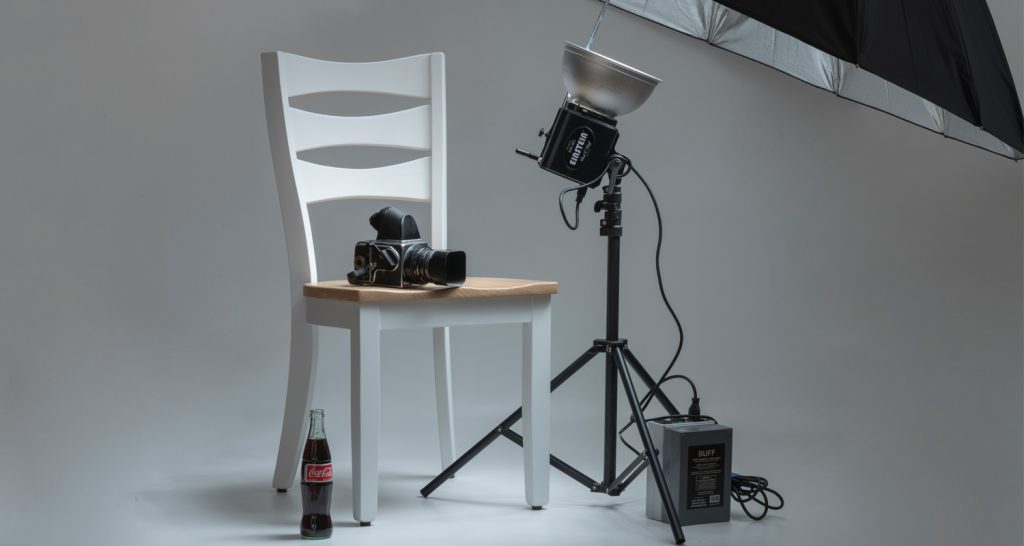
In general the focus will be on the product, both from the viewer and the camera so you want it to be in sharp detail. This is where studio lighting really shines quite literally as it basically smoothes out edges, provides contrast and you have control over shadow – primarily if you want any or not. Having a lightbox is pretty much industry standard for product photography as it can be so versatile for certain controlled environments where you want to capture every element of the subject.

The importance of details is to show the whole product fresh out of the box, spotless and looking amazing so capturing the object looking its best is key. The above shots, while not promoting a specific product, still highlight this point of capturing amazing detail with the studio light reflecting off the bulb evenly and no distractions anywhere else in the frame or on the product – the image as a whole has been considered. So bear that in mind when you come to shoot the item, if it’s clothing, should it be ironed or worn on a model; if it’s cutlery, do you want it set on a table or isolated like the bottle? Think carefully about which details you want to expose and which you don’t.
4 – Technical Restrictions
I won’t go too much into this side of product photography as it falls under a more broad category of website management but it is worth noting that if you’re uploading images to an ecommerce platform, there may be size restrictions. By this I mean actual pixel width and height that you need to consider and this also affects the overall quality of the image. Certain product shots may require using a high-resolution photograph to really show the item off but with this comes issues with site performance. You may need to test out your site’s performance when uploading high-res pictures as this can slow down the website’s overall speed which can deter customers from shopping. It’s something to keep in mind when taking the product photographs.
5 – Editing
Another facet of product photography that is it’s own subject but is still worth mentioning is image editing. Understanding what your editing software is capable of can help massively with workflow. For example batch processing is a fantastic time-saver if you use the exact same environment in each image which is very often the case with product photography. You can edit one photo to your taste and then apply all these adjustments to the entire set. Very handy when reviewing the work and you want to see what a sample edit would look like across the board.
Using the retouch tool is especially useful in this field as you can so easily clean up any discrepancies such as dust, unwanted reflections, shadows or any abnormality that detracts from the overall image. As mentioned though, editing is its own subject so I’ll leave this section brief but as with photography in general; experimentation along with trial and error is always the best teacher.
6 – Lighting
Of course you already know, lighting is everything when it comes to photography and perhaps even more so in product photography. Using daylight with editing software is a solid place to start and images can come out beautifully but if you want to take this practise to the next level, studio lights and a lightbox for instance will really help to capture quality every time. It just provides you with the control and consistency you need for product photography. Getting as much light on the subject matter as possible is generally the rule of thumb as you want as much file data as possible with which to edit.
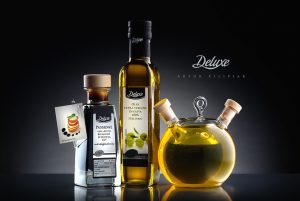
Take the above image for example, another black background but lit perfectly to capture both the colours of the products and the appealing shine and reflections on the glass bottles’ surface. All the details are well lit and as a result, captured perfectly. This is a classic product shot that could be a client request but don’t be afraid to play around with the composition and scene to give something more dynamic. As always it’s trial and error that will land you with the right shot!
Author Bio:
Andrew Farron works for Fable Studios, a Creative-led boutique video and animation studio that creates tailored brand stories that endure in your audience’s mind. Fable combines your objectives with audience insights and inspired ideas to create unforgettable productions that tell the unique story of your brand.